- 1. Documentation
- 2. Documentation
-
3. JS Jobs
- Basics
- Configurations
- Company
- Job
- Resume
- Job Apply
- Credit System
- Credits Log
- Credits Pack
- Purchase History
- Login & Register
- Applied Resume
- Fields
- Custom Fields
- Message System
- Categories
- Data Dictionary
- Users
- Salary
- System Emails
- Address
- Tags
- Reports
- Shortcodes & Widgets
- Job Alert
- Department
- Cover Letter
- Folder
- JS Jobs RSS
- Translations
- Miscellaneous
- Slug
- Errors
-
4. JS Support Ticket
- Basics
- Configurations
- Ticket Via Email
- Tickets
- Staff Member
- Departments
- Knowledge Base
- Downloads
- Announcements
- FAQ's
- Roles
- Priorities
- Categories
- Premade Messages
- Help Topics
- Field Ordering
- Feedback Fields
- Export
- Feedbacks
- Reports
- Miscellaneous
- Support Area
- Breadcrumbs
- Permissions
- Time Track
- Push Notifications
- 5. Jobi
-
6. JS Car Manager
- Basics
- Settings And Customization
- Vehicle
- Credit system
- Credits Log
- Credits Pack
- Purchase History
- Login & Register
- Fields
- Custom fields
- Make And Model
- Data Dictionary
- Users
- System Emails
- Address
- Reports & Stats
- Visual Composer
- Vehicle Alert
- JS Car Manager RSS
- Translations
- Miscellaneous
-
7. JS Job Manager
-
Basics
- Installation
- Job Manager Admin Dashboard
- Job Manager Home Page
- Custom Homepage & Widgets
-
Homepage & Widgets
- Job Manager Pages
- Job Search
- Jobs By Category
- Latest And Featured Jobs
- Count Box
- Latest Resume
- Pricing Tables
- Latest News And Blogs
- Testimonials
- Companies
- Job Manager Info Text
- Newest Jobs
- 4 Box Style For Job Category
- 3 Box Style For Featured Box
- Job Manager Link With Counter
- Google Map
- Image & Text
- Search With Categories
- Team Members
- News & Rumors
- Price Tables
- Team Members
- Testimonial
- System Requirements
- Uninstall
- Theme Sample Data
- Theme Options
- Configurations
- Company
- Job
- Resume
- Job Apply
- Credit System
- Credits Log
- Credits Pack
- Purchase History
- Login & Register
- Applied Resume
- Fields
- Add Fields
- Message System
- Categories
- Data Dictionary
- Users
- Salary
- System Emails
- Address
- Tags
- Reports
- Shortcodes & Widgets
- Job Alert
- Department
- Cover Letter
- Folder
- Job RSS
- Update
- Translations
- Miscellaneous
- Slug
-
Basics
-
8. JS Learn Manager
- Basics
- Configurations
- Admin Side
- Courses
- Course Fields
- Course Level
- Course Language
- Lecture Fields
- Earning
- Payouts
- System Errors
- Login & Register
- Messages
- Payment Plans
- Category
- Email Templates
- Reports
- Awards
- Activity Log
- Users
- User Fields
- Instructors
- Students
- Country
- Shortcodes
- Instructor Side
- Courses
- Instructor Dashboard
- My Profile
- Edit Profile
- Instructor Message
- Student Side
- Courses
- Student Dashboard
- My Profile
- Edit Profile
- Student Message
- Course RSS
- Slug
- Update
- Miscellaneous
Clear History
Make & Model
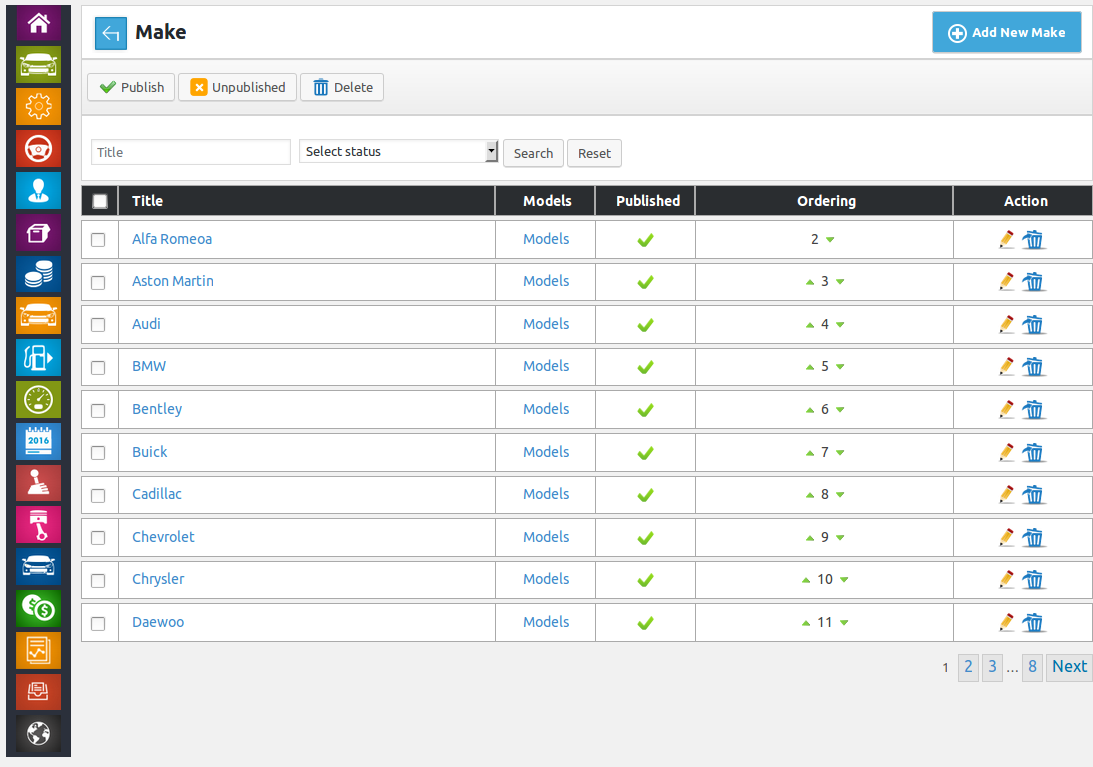
Admin Make Listing
Admin Control Panel > makes.
This page has all the makes defined in the system.
This portion has a back link that takes to control panel, page title and add new make button 
This portion has action buttons that can be used for performing different action on single or
multiple (using check boxes) entities at a time. The buttons that are available are publish,
unpublish and delete.
This portion is filter for makes listing. Admin can filter records on the basis of make
title and make status (published, unpublished). When admin uses filter only records that
fulfill his provided criteria are shown on the page. Reset button will disable filter criteria
and show all records.
This portion is table header it tells us what different columns represent about a record.
First column is a check box it can be used to select multiple makes and perform any action
on those makes using top action buttons.
This portion represents an individual record. It has title, models, published, ordering,
actions for a make.
Make title is text how the make will appear in combo box or as value on (views and listings)
Models is link to models listing page all the models of a specific make are listed.
Publish status controls whether make will be visible in combo box or not.
Ordering means what will be the sequence of the makes in combo box.
Publish, unpublish and ordering can be changed by a single click.

Ordering of any makes can be increased or decreased by a single click.

If admin clicks on edit icon then admin will be redirected to add make layout with details
of make filled in the form(edit case)
If admin clicks on delete icon then make will be deleted, if no vehicle holds that make as
value.
Pagination.
Click here to read more..
Makes > Add New make.

This Page is used for inserting new make in the system. 
This portion has a back link that takes to makes and page title.
This portion has all the fields for inserting a new make, the fields are

Title*: this will be make title
Published: controls publish/ unpublish of make
Logo: Select the logo of make (will be visible on vehicle by makes layout)
fields that have '*' next to their title are required.
This portion has two buttons save and cancel. If all the required fields are filled click on
save make button will save make. cancel button will close this page and take back
to admin makes page.
For edit case this page will hold values of the make that is being edited and click on
save button will save changes.Admin Model/Model Listing
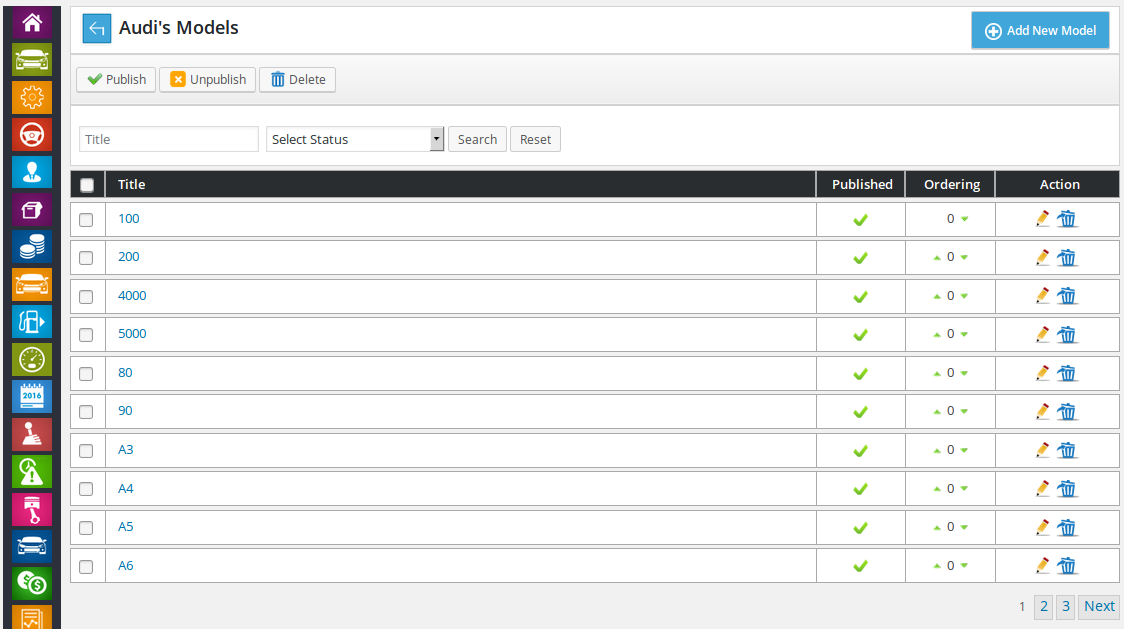
Admin Control Panel > makes > models.
This page has all the models of a specific make.
This portion has a back link that takes to makes listing, page title and add new model button 
This portion has action buttons that can be used for performing different action on single or
multiple (using check boxes) entities at a time. The buttons that are available are publish,
unpublish and delete.
This portion is filter for models listing. Admin can filter records on the basis of model
title and model status (published, unpublished). When admin uses filter only records that
fulfill his provided criteria are shown on the page. Reset button will disable filter criteria
and show all records.
This portion is table header it tells us what different columns represent about a record.
First column is a check box it can be used to select multiple models and perform any action
on those models using top action buttons.
This portion represents an individual record. It has title, published, ordering, actions for a
model.
Model title is text how the model will appear in combo box or as value on (views and listings)
Publish status controls whether model will be visible in combo box or not.
Ordering means what will be the sequence of the models in combo box.
Publish, unpublish and ordering can be changed by a single click.

Ordering of any models can be increased or decreased by a single click.

If admin clicks on edit icon then admin will be redirected to add model layout with details
of model filled in the form(edit case)
If admin clicks on delete icon then model will be deleted, if no vehicle holds that model as
value.
Pagination.
Click here to read more..
Models > Add New model.

This Page is used for inserting new model in the system. 
This portion has a back link that takes to models and page title.
This portion has all the fields for inserting a new model, the fields are

Title*: this will be model title
Published: controls publish/ unpublish of model
fields that have '*' next to their title are required.
This portion has two buttons save and cancel. If all the required fields are filled click on
save model button will save model. cancel button will close this page and take back
to admin models page.
For edit case this page will hold values of the model that is being edited and click on
save button will save changes.Found errors? Think you can improve this documentation? Simply click the Edit link at the top of the page, and then the icon on Github to make your changes.