- 1. Documentation
- 2. Documentation
-
3. JS Jobs
- Basics
- Configurations
- Company
- Job
- Resume
- Job Apply
- Credit System
- Credits Log
- Credits Pack
- Purchase History
- Login & Register
- Applied Resume
- Fields
- Custom Fields
- Message System
- Categories
- Data Dictionary
- Users
- Salary
- System Emails
- Address
- Tags
- Reports
- Shortcodes & Widgets
- Job Alert
- Department
- Cover Letter
- Folder
- JS Jobs RSS
- Translations
- Miscellaneous
- Slug
- Errors
-
4. JS Support Ticket
- Basics
- Configurations
- Ticket Via Email
- Tickets
- Staff Member
- Departments
- Knowledge Base
- Downloads
- Announcements
- FAQ's
- Roles
- Priorities
- Categories
- Premade Messages
- Help Topics
- Field Ordering
- Feedback Fields
- Export
- Feedbacks
- Reports
- Miscellaneous
- Support Area
- Breadcrumbs
- Permissions
- Time Track
- Push Notifications
- 5. Jobi
-
6. JS Car Manager
- Basics
- Settings And Customization
- Vehicle
- Credit system
- Credits Log
- Credits Pack
- Purchase History
- Login & Register
- Fields
- Custom fields
- Make And Model
- Data Dictionary
- Users
- System Emails
- Address
- Reports & Stats
- Visual Composer
- Vehicle Alert
- JS Car Manager RSS
- Translations
- Miscellaneous
-
7. JS Job Manager
-
Basics
- Installation
- Job Manager Admin Dashboard
- Job Manager Home Page
- Custom Homepage & Widgets
-
Homepage & Widgets
- Job Manager Pages
- Job Search
- Jobs By Category
- Latest And Featured Jobs
- Count Box
- Latest Resume
- Pricing Tables
- Latest News And Blogs
- Testimonials
- Companies
- Job Manager Info Text
- Newest Jobs
- 4 Box Style For Job Category
- 3 Box Style For Featured Box
- Job Manager Link With Counter
- Google Map
- Image & Text
- Search With Categories
- Team Members
- News & Rumors
- Price Tables
- Team Members
- Testimonial
- System Requirements
- Uninstall
- Theme Sample Data
- Theme Options
- Configurations
- Company
- Job
- Resume
- Job Apply
- Credit System
- Credits Log
- Credits Pack
- Purchase History
- Login & Register
- Applied Resume
- Fields
- Add Fields
- Message System
- Categories
- Data Dictionary
- Users
- Salary
- System Emails
- Address
- Tags
- Reports
- Shortcodes & Widgets
- Job Alert
- Department
- Cover Letter
- Folder
- Job RSS
- Update
- Translations
- Miscellaneous
- Slug
-
Basics
-
8. JS Learn Manager
- Basics
- Configurations
- Admin Side
- Courses
- Course Fields
- Course Level
- Course Language
- Lecture Fields
- Earning
- Payouts
- System Errors
- Login & Register
- Messages
- Payment Plans
- Category
- Email Templates
- Reports
- Awards
- Activity Log
- Users
- User Fields
- Instructors
- Students
- Country
- Shortcodes
- Instructor Side
- Courses
- Instructor Dashboard
- My Profile
- Edit Profile
- Instructor Message
- Student Side
- Courses
- Student Dashboard
- My Profile
- Edit Profile
- Student Message
- Course RSS
- Slug
- Update
- Miscellaneous
Clear History
Layout Manager
Introduction
We use Helix3 framework in Jobi template. Helix3 is the most advanced Joomla Template Framework packed with mind blowing features. About one of this features we have info below and in this post https://www.joomshaper.com/blog/a-detailed-guide-to-the-helix3-layout-manager
Layout Manager allowing you to build flexible and beautiful layout based on module positions. Layout Builder is one of the unique features of Helix3 which allows anyone to customize the existing template in any shape without having any programming language! In the layout builder we used 6 columns. Those 6 columns covered the whole width of our layout. If you want to create 4 columns then have to use wider blocks for every column.
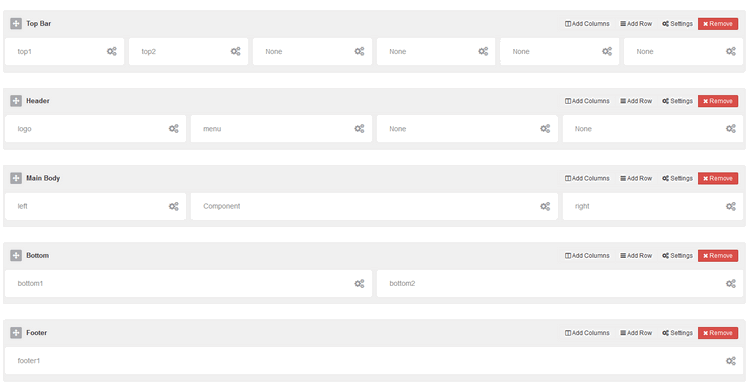
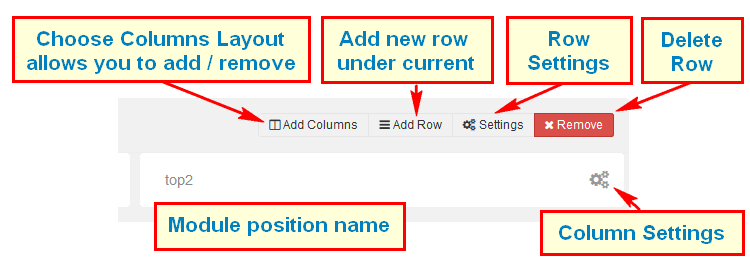
Using Layout Manager is easy to master, learn. Following icons legend should help you understand which icons are responsible for what feature/setting. We suggest to make a copy of current layout to keep it for later in case if you would delete all rows and you forget how they were placed at the beginning.
Each layout which you create can be saved and used later for example in template copy.
Column Settings
Make Component Area - Enable this option to make this column as a Component area. If you already selected component area for another column then unselect that one first then select this one. Joomla message section will also be loaded inside this column. Only one column in whole layout can be used for showing component (!).
Module Position - Select any suitable module position from the list. Do not set one module position to multiple position. Each such have unique name.
Hide on Mobile/Tablet/Desktop - Allows you to choose where this block should be displayed and where shouldn't be. For example some module position can be displayed only on deskop/laptops computer but not on smartphones nor tablets.
Custom CSS Class - If you wish to style particular content element differently, then use this field to add a class name and then refer to it in your css file.
Note! Do not forget to save column settings on popup window - save button is at the bottom, also general template must be saved after changes.
Found errors? Think you can improve this documentation? Simply click the Edit link at the top of the page, and then the icon on Github to make your changes.